 |
Scaling a wood kayak |
|
I am often asked advice on scaling an existing kayak model to suite a
particular purpose. Among the many reasons is to fit the kayak length
into a garage or a workspace, or to make a single kayak into a double,
double into a triple, double into a trimaran outrigger pontoons etc..etc...
Some scaling is relatively easy to do while some is not. As much as I
would like to be able to satisfy every paddler's wish for a "tailor
fit" kayak I can't supervise a remote project or advise on experimental
alterations that I have not verified myself in a shop environment or without
the help of CAD software, prototyping and such. Consequently I can show
you how I would do it manually but "scaling" specifically doesn't
fall under my customer technical support as it otherwise applies to help
with "standard plans". So, if you plan to scale your kayak,
here is one reasonable way you can accomplish it. Limits of this scaling method:
|
||
| Cape
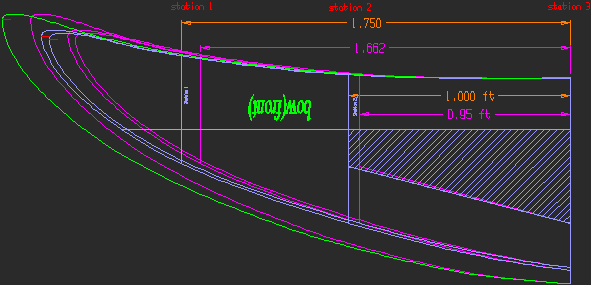
Ann Double outline at full size (purple stations) and reduced to 95% of
the original size (green stations). Note, that scaling by "percentage",
all the reference points on the kayak are shifted by that percentage. This
means that the overall kayak length is 95% of the original, the station
spacing is 95% of original as well as locations of cockpits, LCG of paddlers,
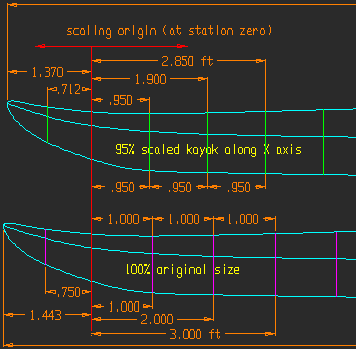
LCB of kayak etc.. You may ask: "Shifted to where?" Well, to help with scaling we need to select a "reference point" or "scaling origin" from which all other reference points are scaled, measured and verified. It makes no difference where the scaling origin is on the kayak. The ultimate results will be the same. A good scaling origin can be at station "0" or at one of the stations in the middle of the kayak. After you pick a scaling origin, let's say station 11 in the middle, every identifiable point on the kayak will be shifted towards station 11 by 95%. If you are scaling over 100%, the points will be shifted away from the origin. Example 1: The scaling origin is at station marker 11. How far will station 10 and 12 be from 11? Since we are scaling by 95% and the existing station spacing is 12 inches, station 10 and 12 will come "towards" station 11 and the new spacing will be 12" x 0.95 = 11.4" Example 2: The scaling origin is exactly half way between station markers 10 and 11. How far will station markers 10 and 11 be from the origin after scaling 95%? Now, the stations are exactly 6" from the "origin" so we bring each station towards the origin and the new distance will be 6" x 0.95 = 5.7". The stations will now be spaced 5.7" to each direction from the "origin", so 2 x 5.7" = 11.4" which is the new stations distance, as it should be. This shows the independence of the "origin" location on the final results which will be the same no matter where the origin lies. In other words, the only thing that doesn't move is the origin but everything else moves in relation to the origin.  Below is an example of what the scaling should look like when the origin is at station "0". Note that all the dimension in the top drawing are exactly 95% of the equivalent dimensions of the lower drawing.  |
||
Steps for scaling: |
||
| 1)
Scaling Spine: All plans show the layout of the stations on the original
spine so you can always refer to it. The original length of the spine for
the double for example is exactly 18 feet long with station spacing of one
foot. If you want to reduce the size, I recommend to first cut the spine
and mark the station spacing exactly as intended for full size construction. 2) Select an "ORIGIN" which in this example is station 11. Now, take a different color pencil and layout all stations markers at your selected scale from station 11. Here the spacing for 95% scale would be at 11.4" intervals from st.11. Cut the tapers on the spine ends last. Note, that only the longitudinal dimensions change but all other vertical dimensions and alignment lines stay the same.  3) Scale the BOW and STERN stations. The purple lines below show 95% scale relative to the full size bow. You can trace the new shape on the existing plans first and then put it on the particleboard and cut the new outline. The important thing here is to shift the stations properly and to modify the taper. The outline of the Bow or Stern is less important since there is quite a bit of "artistic leeway" with the final shape of the stems. Leave the bow/stern outline as is if you wish (but account for the fact that the tips stay at the original size so the final kayak size will be slightly longer than you scaled) or change the outline as indicated by the purple lines. 
4) Create a "side view" drawing with ALL the stations and ALL new calculated dimensions so that you can refer to it when you mark the spine. The rest of the construction is exactly the same as for the full size plans. This means that there are the same number of stations and so is the offset of the particleboard thickness towards the "center of spine" relative to the new station markers. |
||
| Home | Kayak Designs | Kayak Shop | Materials | Kayak Gallery | About us |
| Building Manual | Plans | Sandwich Core | Wood Kayak | Order | |
| Epoxy Test | Abrasion Cloth | Rudder | Resources | Choosing Kayak | Guestbook |